How to Start Windows 8.1 in Safe Mode

You need to start Windows 8.1 in Safe Mode if you have to boot and run your Windows 8.1 laptop or desktop computer in a limited state or to repair your computer. Starting Windows 8.1 in Safe Mode might be very useful in some cases, for example, if you have installed a new application or driver and your computer freezes, locks up, or crashes, you can use the Windows 8.1 Safe Mode option to detect what is source of the problem in your computer and fix it.
Booting Windows 8.1 in Safe Mode and running an antivirus program in the safe mode is sometimes recommended to eliminate viruses, spyware, and to protect your Windows 8.1 computer from other types of threats. Starting Windows 8.1 in Safe Mode allows you to run your computer with a limited number of files and drivers which are necessary for running Windows 8.1.
To go to Safe Mode in Windows 8.1 preinstalled laptops and desktops seems to be a bit tricky but you can get to Safe Mode in Windows 8.1 quite easily by following the steps shown below. In this guide, we will show you how to access Safe Mode in Windows 8.1 with screenshots.

Lets look at how to Start Windows 8.1 in Safe Mode

1) To enter Safe Mode in Windows 8.1, you first need to go to the PC settings. To open PC settings, open the search tool by pressing WINDOWS key + Q.
2) Search for PC settings in the Windows 8.1 search tool. Click on PC settings displayed in the search result to open PC settings.
search PC settings in Windows 8.1 search tool
3) You will see the screen as shown below. Click on Update and recovery.
click on Update and recovery - How to Start Safe Mode in Windows 8.1
4) Inside Update and recovery, click on Recovery. In the Advanced startup section, click on Restart now, and wait for few seconds.
click on Restart now - How to Enable Safe Mode in Windows 8.1
5) Windows 8.1 will ask you to choose an option. Click on Troubleshoot.
Click Troubleshoot - How to Go to Safe Mode in Windows 8.1
6) Click on Advanced options as shown below.
click on Advanced options
7) Inside the Advanced options, click on Startup settings.
click on Startup settings
8) Inside Startup settings, you can see a number of options including Enable Safe Mode. Click on Restart and wait while your Windows 8.1 computer restarts.
click Restart to Enable Safe Mode in Windows 8.1
After your computer has started, you will see the screen as shown below. You can see the options related to Safe Mode such as Enable Safe Mode, Enable Safe Mode with Networking, Enable Safe Mode with Command Prompt. Press the number displayed on the left side of Enable Safe Mode to restart Windows 8.1 in Safe Mode.
Press the number written before Enable Safe Mode
Now, your Windows 8.1 computer will start in Safe Mode as shown below.
Windows 8.1 running in Safe Mode
Now, you can use Windows 8.1 Safe Mode for debugging, repairing, or for any other purpose for which you wanted to run Windows 8.1 in Safe Mode.

How Start your PC in safe mode in Windows 10

     Safe mode starts Windows in a basic state, using a limited set of files and drivers. It can help you troubleshoot problems on your PC. For example, if the problem doesn't happen in safe mode, you'll know default settings and basic device drivers aren't causing the issue.
There are two versions of safe mode: Safe Mode and Safe Mode with Networking. They're quite similar, but Safe Mode with Networking includes the network drivers and services you'll need to access the Internet and other computers on your network.
The following sections describe how to start your PC in safe mode

From Setting
  1. Press Windows logo key Windows logo key+I on your keyboard to open Settings. If that doesn't work, select the Start button in the lower-left corner of your screen, then select Settings.
  2. Select Update & security > Recovery.
  3. Under Advanced startup, select Restart now.
  4. After your PC restarts to the Choose an option screen, select Troubleshoot > Advanced options > Startup Settings >Restart.
  5. After your PC restarts, you'll see a list of options. Select 4 or F4 to start your PC in Safe Mode. Or if you'll need to use the Internet, select 5 or F5 for Safe Mode with Networking.

From Sign in Screen

  1. Restart your PC. When you get to the sign-in screen, hold the Shift key down while you select Power Power icon > Restart.
  2. After your PC restarts to the Choose an option screen, select Troubleshoot > Advanced options > Startup Settings >Restart.
  3. After your PC restarts, you'll see a list of options. Select 4 or F4 to start your PC in Safe Mode. Or if you'll need to use the Internet, select 5 or F5 for Safe Mode with Networking.

How to Partition a Hard Drive in Windows 10

You might be looking for an easy way to partition a hard drive in Windows 10 if you have installed Windows 10 on your laptop or desktop. If your computer's hard drive has only one partition, you should create hard disk partitions on your Windows 10 computer to make it clutter free and organized for better management of your files and data.
By partitioning the hard drive in your Windows 10 laptop or desktop computer, you will be able to create two or more partitions to separate your personal files such as music, photos, videos, movies, documents, etc. from the operating system and program files.
Generally, Windows 10 operating system and program files are located in the C: drive, and if you have only one partition, for example C: drive, on your computer with sufficient free space, then you should partition your hard disk or drive and create a new D: drive for keeping your personal files and folders.
You can easily partition a hard drive in Windows 10 using the Disk Management utility which comes with Windows 10 without installing a third party software for partitioning a hard disk. In this guide we will show you how to partition a hard disk in Windows 10 using the Disk Management Utility.

How to Partition a Hard Drive in Windows 10?

1) Open the Start menu or Search tool in Windows 10 and search for "hard disk partitions". Click on "Create and format hard disk partitions" in the search results as shown below to open the Disk Management utility.
Search for hard disk partitions and click on Create and format hard disk partitions in Windows 10
2) Now, you will need to shrink an existing partition on your Windows 10 computer to create space for the new partition. To shrink a partition, for example C: drive as shown below, right-click on the partition you want to shrink then select Shrink Volume.
Shrink an existing partition to create a new partition in Windows 10
3) In the Shrink window, you will see the total space before shrinking and the maximum amount of space you can shrink in MB. Enter the amount of space you want to shrink in MB as shown below then click on the Shrink button. If you want to create the new partion with 100 GB space on your Windows 10 PC, you can enter 102400 MB to shrink the existing partition by 100 GB. For 50 GB, you can enter 51200 and for 200 GB, you can enter 204800.
For a general rule, if you want to shrink Y GB, you should enter Y * 1024 MB.
Note: Remember, you will get a little less amount of hard disk space for the new partition then the amount you entered to shrink because some space is used for disk management by the operating system. If you have entered 102400 for shrinking 100 GB you will get around 99.9 GB for the new partition.
Enter shrink amount in MB create hard disk space for a new partition in Windows 10
4) After you have shrinked an existing partition, you will see the amount of space shrinked as Unallocated space. The image below shows 100.00 GB unallocated space. Right-click on the Unallocated space and select New Simple Volume... to open the New Simple Volume Wizard to create a new partition as shown below.
Right-click on the Unallocated space and select New Simple Volume to make a new partition in Windows 10
5) Click Next in the New Simple Volume Wizard.
Click Next in the New Simple Volume Wizard to start partitioning a hard drive in Windows 10
6) By default, the volume size for the new partition is equal to the maximum disk space available. If you want, you can specify a lower volume size than the maximum available space for the new partition. If you specify a lower amount, the extra space will remain unallocated. To convert all the unallocated space into a new partition, you should not change the default value. Now, Click Next.
Specify volume size or leave the default value of Volume size for the new partition in Windows 10
7) Now, you can choose a Drive letter for the new partion on your Windows 10 PC. Assign a drive letter then click Next as shown below.
Assign a Drive letter for the new partition in Windows 10
8) Click Next to format the new partition with the default file system NTFS.
Click Next to format the new partition with NTFS in Windows 10
9) Click Finish to complete creating a new partition in Windows 10.
Finish partitioning a hard drive in Windows 10
After a new partition is created you can see the new partition inside This PC in File Explorer. Now, you can use your new partition to keep your personal files and folders and organize your Windows 10 laptop or desktop PC smoothly and efficiently.

How to create a bootable Windows 10 USB flash drive Method 4

      It is useful to know how to make a Windows 10 bootable USB drive if you are planning to install Windows 10 on your laptop or desktop. Some people, even if they have optical disk drive installed on their devices, sometimes want to use their pen drive or thumb drive to install Windows 10 on their computer. Many new devices such as some ultrabooks, small laptops, and tablets do not have an optical disk drive and it is not possible to install Windows 10 using CDs or DVDs on those devices.
If you want to install Windows 10 from a USB drive, you will first need to create a bootable USB for Windows 10. Since Windows 10 is currently not available for download, we are using the Windows 10 iso file. You can download the Windows 10 iso file from here https://www.microsoft.com/en-us/software-download/techbenchYou can see our guide on how to download Windows 10 iso file without Media Creation Tool.
Making bootable USB drive for Windows 10 using your flash drive or pen drive is quite easy and you can achieve it by following the steps shown below in this guide. You will need the Windows 10 iso file and an empty removable USB drive with a capacity of at least 4 GB for 32 bit version of Windows 10, and for 64 bit version of Windows 10, a USB drive with a capacity of 8 GB is recommended in order to store all the installation files.
Note: If you have Universal USB Installer, you can go to the link below. How to create Windows 10 bootable USB using Universal USB Installer
Creating Windows 10 Bootable USB
Download the official Windows 7 USB/DVD Download Tool from Microsoft Store. This tool is available at http://wudt.codeplex.com. It helps to move the contents of the Windows 10 iso file to a USB drive and make it bootable.
Windows USB/DVD Download Tool for Windows 10
Now, install and run Windows 7 USB/DVD Download Tool. After the tool has started, you will see the screen as shown below. In the Source file field, select the Windows 10 iso file located on your computer as shown below, then Click Next.
Note: Some Windows 8 and 8.1 computers have problems installing this tool. If you are getting some error while trying to install this tool, you can see our guide on how to create Windows 10 bootable USB flash drive using Universal USB Installer.
Select Windows 10 iso file located on your computer
Click on USB device as media type.
Choose USB device as media type
Select the USB device which you want to make bootable from the drop-down list and click Begin copying.
Select a USB device from the list
Wait while the Windows USB Download Tool creates Windows 10 bootable USB device. This process takes a few minutes.
WUDT is create a Windows 10 Bootable USB
After the Windows 10 bootable USB drive is created successfully, you will see the screen as shown below.
Windows 10 Bootable USB has been created
Now, you can use Windows 10 bootable USB drive to install Windows 10 on your computer

How to create a bootable Windows 10 USB flash drive Method 3

      Gone are the days when you had to use a DVD and an optical drive just to install an operating system. Thanks to high data capacity USB flash drives. Now you’re able to make bootable USB of almost every operating system, all you need is setup files and a spare empty USB with gigabytes of storage.
It is no surprise that Microsoft’s most powerful operating system, Windows 10 can be installed through a USB drive, although you need to perform few easy steps to make it bootable which are mentioned in the guide below.

REQUIREMENTS FOR MAKING WINDOWS 10 BOOTABLE USB:

1. 8 GB USB flash drive.
The drive has to be in good condition and also must be from a good manufacturer e.g. SanDisk.  I’m saying this because sometimes Windows installation gets stuck or gives Blue Screen of Death (BSoD) when you use a faulty USB drive.
Windows 10 RTM ISO2. Windows 10 Professional ISO from Microsoft
Microsoft provides operating system downloads in form of .iso file extension. The ISO file can be used to make Bootable USB drive and DVD’s.  You can download the latest Windows 10 ISO build from Microsoft website.
  • en_windows_10_pro_10240_x64_dvd.iso
  • en_windows_10_pro_10240_x32_dvd.iso
Rufus_USB_tool
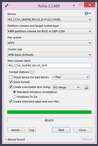
3. Rufus, Bootable USB maker tool
Rufus is a free versatile utility that lets you build Bootable USB of operating systems. It formats USB filesystem and makes the USB bootable using the ISO file.
Alternatively,you can use Microsoft USB/DVD Maker tool which is slightly outdated and does not support UEFI.


STEP-BY-STEP GUIDE TO MAKE WINDOWS 10 BOOTABLE USB:

1. Download the Rufus Bootable USB maker tool and Windows 10 ISO from the links mentioned above.
Windows 10 Bootable USB maker
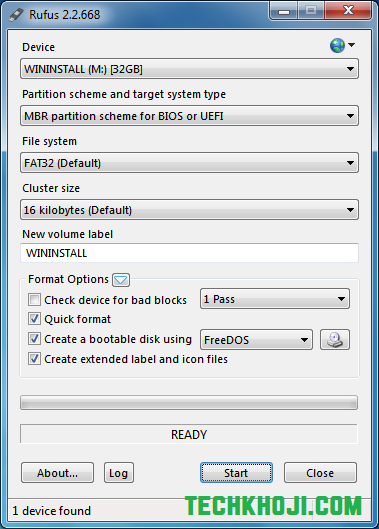
2. Start the Rufus tool and connect your USB flash drive, if User Access Control (UAC) prompts, click Yes.
Select ISO file Windows 10
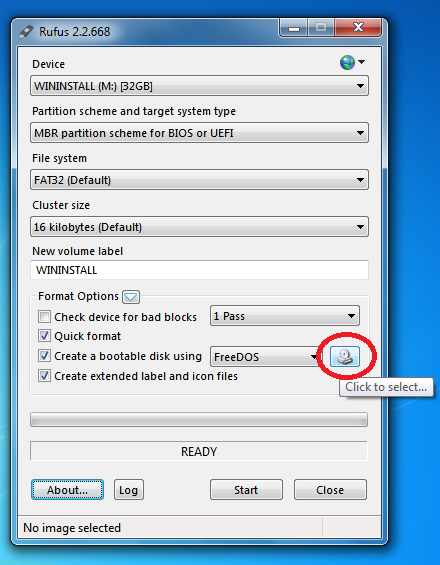
3. Click the small CD/DVD drive Icon on the format options box. Now browse through your downloaded files and select Windows 10 ISO file that you downloaded.
4. Make sure you have selected the correct USB Device, go to My Computer and check the Device Letter and its size so you don’t format the wrong drive by mistake.
5. [Optional step] You can change the partition, file system and system type. If you don’t know them skip this step and leave the settings to default.
Making Windows 10 bootable USB
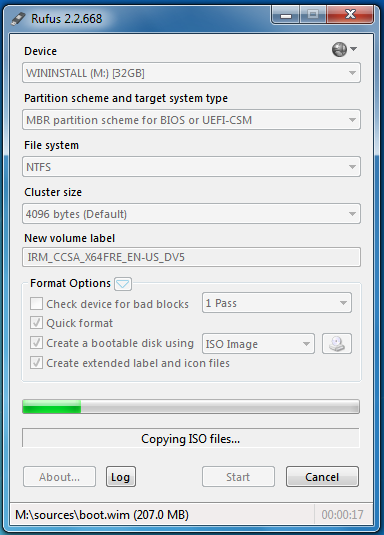
6. After you have selected both ISO file and USB drive, click Start to begin making bootable USB, it will show a warning that it will erase everything, that’s obvious, just click Yes.
It will take approximately 10 minutes to make bootable USB for Windows 10. When the process is done. Connect the USB to the PC you want to install Windows 10 to and set the first boot device to USB storage in the BIOS.

How to Restore Windows 10 to Factory Settings

You might want to factory reset your Windows 10 PC if you are having problems with your Windows 10 computer, for example, your Windows 10 laptop or desktop computer freezes, locks up, or is running slowly. Restoring Windows 10 to factory settings will bring your Windows 10 laptop or desktop to the state when it was first turned on.
Restoring Windows 10 to factory settings is a bit different from refreshing Windows 10. Refreshing your Windows 10 PC reinstalls Windows 10, and keeps your files such as photos, videos, documents, etc. intact. But factory resetting your Windows 10 computer not only reinstalls the Windows 10 operating system, it also removes all your files from the partition on which Windows 10 is installed and optionally it also lets you to remove all your files form all the partitions on the hard drive of your computer.
If you have installed Windows 10 preview on your laptop or desktop and you are having problems with it, you can factory reset it to make it work like a fresh install. In this guide, we will show you how to factory reset Windows 10 with screenshots.
Note: If you want to carry out a new installation of Windows 10, you can seehow to install Windows 10 from a USB flash drive.

How to Factory Reset Windows 10?

1) To factory reset Windows 10, you need to go to the Recovery section inside the PC settings. To go to the Recovery section, search for "reinstall" in the search tool inside the Start menu then click on "Remove everything and reinstall Windows" in the search results as shown below.
Search for reinstall - How to Factory Reset Windows 10
2) Now, in the Recovery section of Windows 10, click on the Get started button just below the heading "Remove everything and reinstall Windows" to start restoring Windows 10 to factory settings.
Click on Get started to start factory resetting process in Windows 10
3) Remember, factory resetting Windows 10 will reinstall Windows 10, change the PC settings to their defaults, and remove all your files. Click Next.
Click Next to start restoring Windows 10 to factory settings
4) If your Windows 10 PC has more than one partitions on the hard drive, you will see the screen showing "Your PC has more than one drive".
Note: If you do not see the message "Do you want to remove all files from all drives?" on the screen, you can move to the next step.
Here you can choose to reset only the partion on which Windows 10 is installed, for example, C:drive or you can choose to reset all the partitions on the hard drive of your computer. Remember, all your personal files stored on the drives you choose will be removed.
If you want to restore only the drive on which Windows 10 is installed, you should click on "Only the drive where Windows is installed. If you want to factory reset all the drives on your Windows 10 computer, you should click on "All drives".
5) Now, you will see the screen as shown below. If you want to factory reset Windows 10 quickly, you can choose "Just remove my files". If you select "Just remove my files", your files and data will be removed quickly and some data might remain recoverable using special softwares even after Windows 10 has been restored to factory settings.
The other option "Fully clean the drive" takes 50 minutes or more to factory reset Windows 10 depending on the computer's speed. If you choose "Fully clean the drive", it will erase your files and data thoroughly, and it is less likely to be able to recover your files and data after the factory reset. If you are planning to donate or sell your Windows 10 PC after factory reset, you should choose this option.
Just remove your files or fully clean the drive while restoring Windows 10 to factory settings
6) Make sure your Windows 10 laptop or desktop PC is plugged to the power supply and it is not running on battery. Remember, after you click on the Reset button, you might not be able to cancel the factory reset process. Click on the Reset button to start restoring Windows 10 to factory settings and follow the instructions.
Click Reset to start factory reset process in Windows 10
In the resetting process, you might be asked to accept the Windows license and enter details such as PC name.
Windows 10 factory reset
After the Windows 10 factory reset process has been completed, you can use it as a new computer

How to create a bootable Windows 10 USB flash drive Method 2

Maybe you don’t like having a tool automate the process for you, or maybe you just love using the command prompt. Regardless of your reasons for creating a bootable Windows 10 USB drive manually, here are the steps on how to do it.

Before you start, you’ll need the .ISO file for Windows 10 — you can get this from various unofficial sources, but there are many official ones as well (the aforementioned Windows 10 Media Creation Tool can make one for you). If your Windows 10 installation image is in a different DVD image format, convert it to an .ISO file.
Open the command prompt as the administrator (search for cmd, right-click, and choose “Run as administrator”), type “diskpart” without the quotes, and hit enter. Alternatively, open up the Start Menu, type “diskpart” without the quotes, and click Yes if prompted by UAC to give the program permission.
windows_10_usb_8
Plug in your USB drive. Type “list disk” without the quotes and hit enter. Take a look at the Size column and figure out which disk number your USB drive is.
windows_10_usb_9
Ours is number 1, so we’re going to type “select disk 1” without the quotes and hit enter. Adjust your disk number accordingly.
windows_10_usb_10
If you haven’t done a backup of the contents on your USB drive, now is your last chance. Now wipe the drive by typing in “clean” without the quotes and hitting enter.
windows_10_usb_11
Now we want to prepare the USB drive for the Windows 10 files and ensure it is bootable. Type “create partition primary” without the quotes and hit enter.
windows_10_usb_12
Then type “select partition 1” without the quotes and hit enter.
windows_10_usb_13
Next type “active” without the quotes and hit enter.
windows_10_usb_14
Finally, type “format fs=fat32” without quotes and hit enter. This will format your USB drive in the Fat32 format using the Quick routine. (If you choose to use NTFS instead, you’ll later have to run a different command to put boot manager compatible files onto your USB drive to make it a bootable device.) This process will take some time, depending on the size and speed of your USB drive.
windows_10_usb_15
When that’s done, type “assign” without the quotes and hit enter (this will assign a new drive letter to the USB flash drive, making it accessible). Your USB drive will likely automatically open (if it doesn’t, find it in My Computer or This PC). Remember the drive letter (in our case it is H).
windows_10_usb_16
You now have two options. You can extract the contents of the .ISO image file (open them in Windows Explorer or using your favorite extraction tool, and copy them directly to the USB drive) or you can mount the .ISO (use your favorite mounting tool) and let command prompt do the work.
windows_10_usb_17
We’ve been using the command prompt up to this point, so we’ll do this last step using it as well. Close diskpart and open up cmd again. Type “xcopy g:*.* /s/e/f h:” without the quotes, where “g:” is the drive letter for your mounted .iso file and “h:” is the drive letter for your USB flash drive. Don’t worry if install.wim takes a while to copy: It’s easily the biggest file on the disc.
windows_10_usb_18
Type “exit” without the quotes and hit enter. You’re done. You can now install Windows 10 from your USB drive, either by booting from it or from within an existing installation of Windows.

How to create a bootable Windows 10 USB flash drive Method 1

Even with the rise of cloud storage, the USB flash drive is still vital for cases where the Internet won’t cut it, especially as CDs and DVDs die off. Not only are USB drives typically higher in capacity than disc media, they are faster for copying data such as setup files, and have much quicker access times as well. In short, installing software as large as Windows 10 from a USB drive is simply much faster than from a DVD (and of course the only viable option for PCs without an optical drive).
Unlike with previous Windows releases, Microsoft sells Windows 10 on USB drives. If you’d rather make your own, however, this guide will show you two different ways to create a USB flash drive that works just like a Windows 10 DVD.
To be clear, both these approaches will only show you how to put Windows 10 on a USB flash drive. If you want to actually install Windows 10, you’ll still have to use the USB drive, Windows Update, or the manual method.

Windows 10 Media Creation Tool

You’ll need a USB flash drive (at least 4GB, though a bigger one will let you use it to store other files), anywhere between 6GB to 12GB of free space on your hard drive (depending on the options you pick), and an Internet connection.
If you’re running a 32-bit copy of Windows, download the tool from here. If you’re running a 64-bit copy of Windows, download the tool from here. If you’re not sure, hold the Windows key and press the pause/break button. See what it says under “System type.”
system_type
You should see the following after downloading and launching the tool:
windows_10_usb_1
Choose “Create installation media for another PC” and hit the Next button
windows_10_usb_2
Pick your language and one of the following editions: Windows 10 Home, Windows 10 Home N, Windows Home Single Language, Windows 10 Pro, or Windows 10 Pro N. The N variants only differ in the fact they don’t include Windows Media Player.
If you’re upgrading from an older version of Windows as opposed to doing a clean install, you’ll want to pick the equivalent edition for the upgrade to work. As for Architecture, pick either 32-bit (x86) or 64-bit (x64) just like before — you can also choose “Both” but I typically just end up going with 64-bit since almost every computer nowadays is 64-bit. Hit Next.
windows_10_usb_3
The tool will now check that you have enough space on your hard drive, based on previous choices. If you don’t, you’ll have to start the process again.
windows_10_usb_4
Keep the first option and insert your USB drive now. Hit Next.
windows_10_usb_5
Pick your USB drive from the list. Remember, this process will overwrite everything on the drive. If you have data on the device, first move it to your computer, another USB device, or somewhere else, and then resume when you’re done. Hit Next.
windows_10_usb_6
Windows 10 will start to download, which may take a while if you’re on a slow connection
windows_10_usb_7
You’re done. You can now install Windows 10 from your USB drive, either by booting from it or from within a current installation of Windows.